Showing posts with label olivia's room. Show all posts

Tuesday, May 22, 2012

Ugly Picture Frame to Modern Mirror


I am loving how this project ended up. It was totally random, and I just kind of went with it, and let it become what it was meant to be. Usually I have a pretty detailed plan laid out in my mind before I start a project. When I started this one I thought I knew what I was going to do, but then I was inspired, and the store I went to didn't have the right color paint, so I just winged it.

I found this frame at a garage sale over the weekend, and I figured for 50 cents it was worth a shot to see if I could make it over. I loved all the girly details, and I liked that it had that faux bamboo texture. 

This is what it looked like when I brought it home-


It's most definitely dated, but I was hoping some paint would mask it's ugly past.

I removed the back to see what I was working with. I was pleasantly surprised to see that it was very sturdy, and in great condition. All I needed to do was clean it up a little, and get to work. I washed it up, and peeled the "painting" off the particle board.

I started with two light/ thin coats of quick drying primer from SW, then I did another two light/ thin coats of Ivy Leaf by Krylon. It wasn't my first choice, but the hardware store that was open had a very poor selection. It must have been fate. :)

hmmm...
what to do for the art?

I thought and thought about it, and after a few minutes it came to me.
Maybe that's because I was checking out Land of Nod a few days ago, and saw this-


or maybe I'm a genius! I was thrilled at the idea. I measured the original glass, and it was exactly 12x12, that shouldn't be too hard to find. So the wheels started turning, as I tried to think of a place where I could find an inexpensive 12" mirror. 

Then I saw it, the builder basic mirror that I took down in our powder room. Maybe I could use a razor knife, and cut it up!

I decided to google it, and there were tons of tutorials.
I realized that I was going to need a glass cutter to get this done, so I picked one up for about $4 at the Hardware store. (the one with a very poor selection of spray paint colors)


All I did to cut the mirror was hold my straight edge up to the edge of the mirror, and make marks at the 12" mark then I lined the straight edge up to the marks, dipped my cutter into some oil and pulled it towards me. I did the same thing in the other direction, and I was done. This was my first time cutting glass, and it only took about 10 minutes. It wasn't perfect, at all, but the edges don't show, so it really doesn't matter. The same thing goes for the bevels, I was going to cut them off, but they are covered by the frame, so I left them. 
See how wavy that right side is? I'm sure if I wasn't in such a hurry it would've looked much nicer. My first cut was perfect, but that second one was pretty wonky. Oh well!


After I cut the mirror, I went to check on the frame, and it was still a little tacky, so I gave it a quick blow dry, and brought it in to put back together! So excited! 

Here's a before and after to show you just how much of a transformation it went through!


I'm thinking about highlighting the details with some light aqua paint, what do you think?


Monday, May 7, 2012

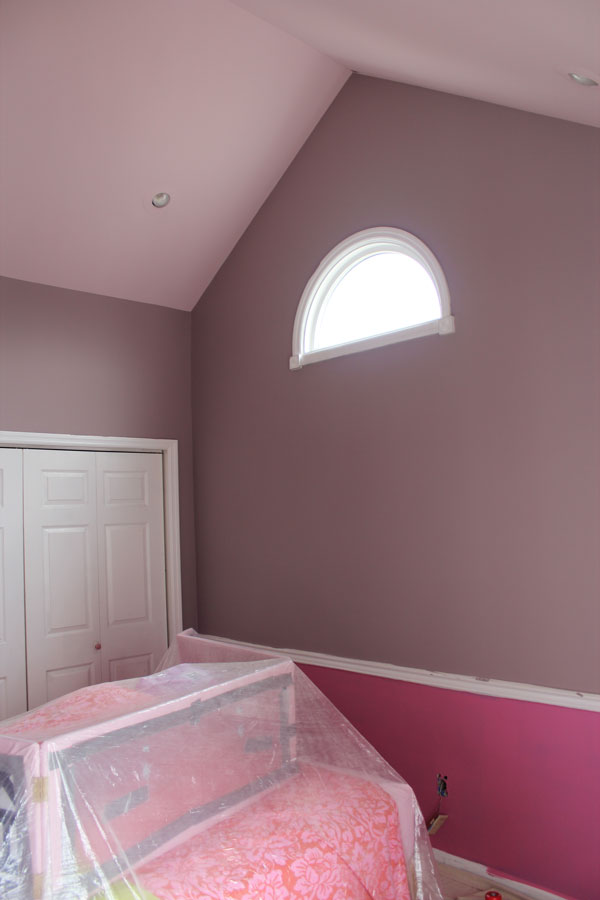
Painting Progress for Our Princess

Mike worked really hard in Olivia's room this weekend, and we made some big progress. 


All we Mike needs to do is another coat or two of the hot pink below the chair rail, and then it will be time for me to come in and get my stencil on! I am SO excited! Here are some before and after shots of our progress so far.

This is what the room looked like right before we started painting-
(this is how the house was painted when we bought it)


This is how the room looks now-
The bright pink is showing up brighter than it is in real life, but everything above the chair rail is pretty accurate.


I am really happy with how everything is going, and I am so excited for it to be finished! I need to work on the floor plan today, hopefully I can come up with something great!


Friday, April 6, 2012

Bay Window Cornice Box Tutorial

I am really excited to share the tutorial for my easy and inexpensive bay window cornice box. While I know that there are a bunch of pelmet/cornice tutorials floating around in bloggy land. I searched high and low for a DIY for a bay window, and couldn't find one, so here it is.
This is the step-by-step for a bay window cornice box.


Supplies:


The sizes and amounts of supplies you need will vary depending on the size of the window you are dressing as well as the height of the Box. I will tell you the supplies I needed for my dimensions.

Foam Board: 4'x8'x1/2"- The foam core I bought is meant to be used as insulation for a home, the sheet was huge, and it barely fit in my giganto mini-van, so beware of this when purchasing. You might need to find a smaller sheet, or sweet talk them into cutting it for you if you have a smaller vehicle.
Staple Gun & 3/8' staples: mine are about 30 years old (if not more), so if you have a staple gun and staples that you love then use those. just make sure your staples are not longer than the thickness of your foam, my foam was 1/2' thick, and the staples were 3/8' so it worked perfectly.
Duct Tape: I just used the cheapest duct tape we had in the house. The fancy stuff wasn't necessary for this project.
Power Drill: I used mine for hanging the cornice. If you don't have a power drill and don't think you need one, just use a screwdriver and some good old fashioned muscle!
Corner Braces: (6) you will need 4- 3" braces, and 2 of the  2" or 2.5" braces. They were the least expensive at walmart.
Hinges: (4)I also found the best price for these was in the hardware section of walmart. You will need 4 - 3 or 3 1/2" Hinges. They come in a pack of 2, so buy 2 packs.
Square Mounting Tabs: These are small pieces of foam that are sticky on both sides. I found them at the dollar store.
Ladder Hooks: (2) these are used to hold a ladder up on the wall usually, but they worked wonders for hanging a gigantic cornice box also.
Soda Can Tabs: (4) I had no problem collecting these because I have a not-at-all secret love affair with Cherry Coke Zero. If you don't have a soda problem like me I'm sure you could ask a friend or neighbor to save 4 cans for you, or just pick a few up next time you're out.
Fabric: I needed 3 1/2 yards for my cornice box, the amount you will need depends on how wide your window is and how high you will be making the box. The way I measured is the very first step, so scroll down and have a look!
Batting/ Insulation: I used thermolam. You will need the same amount of batting as you did fabric.


OK! So Let's get this Bay-Window-Cornice-Box Party started!!!

The first thing you want to do is take your measurements. I drew myself a little diagram so it would be easy to understand when I came back to reference it. I wanted it to be 17" high. I held my ruler about 5" away from the window to take the width measurements, because that's how far I wanted it to come out.


When you have your diagram drawn up it's time to cut your foam pieces. For my window I needed:
1 Piece- 45"x17"
2 Pieces- 31"x17"
2 Pieces 5"x17"
I used a big metal ruler and an exacto knife to cut the pieces, but I'm sure you could improvise and use any straight edge you have around the house.
I cut the front with the straight edge, then flipped it over and went over it by hand on the back.

When you have all your pieces cut you'll want to attach your side pieces to the two end panels. You will need the two smaller hinges, and the foam mounting squares.

Hold the hinge up near the middle of the board and mark where the holes will go. Cover each mark with a foam mounting square (this helps prevent the hinge screws from going through the other side of the foam.)


Attach your hinges on top of the mounting squares. You'll want to screw the screws in at a slight angle.


When both of your small side pieces are attached to the end panels, you will want to measure and cut your fabric and batting. Lay your panels on top of the fabric, and cut the fabric with 3 to 4 inches around the edge. If your fabric has a pattern make sure the pattern is going the same way on all three pieces! 
Make sure you include the side pieces when measuring your cuts, you need enough to wrap around them with a few inches to tack the fabric down.


Once all of your fabric and batting is cut it is time to attach it to the foam. I stapled mine, then went over it with duct tape to make sure it would stay put, you could also try a hot glue gun.
First staple the batting on. Make sure you pull it tight. Cut the corners off of the batting to eliminate bulk.


Next, you want to staple your fabric onto the foam. You will do this the same way you did the foam, but 
DO NOT cut the corners off. You don't want any frayed edges to show on the front of your finished box.
You can also see how I went over the staples with duct tape after I was done stapling.

We're almost there! 

When your three (or more) sections are all finished it's time to attach them to one another. If your window is very large I would recommend doing this in the room where you will be hanging the cornice box.
Attach two hinges to each joint, following the directions on the package. They should look similar to this.


All that's left is hanging it on the window! WOO-HOO! 
This is the part that took me the longest to figure out, but when I finally did it went up really easily. 

Hang your two ladder hooks spaced evenly above the middle window, and two corner braces on the outside edges of the window. I circled them in white so they are easier to see. 


To get the soda tabs ready you need to use a pliers and bend the make the larger opening large enough to fit on your ladder hook. Then bend it in half so it looks like this.


To figure out the spacing for my soda tab hooks I taped markers to my ladder hooks, and held a piece of tape up to it to get the exact spacing. I centered the tape on my middle panel and used it as a guide to attach the soda tabs.


I used a lot of glue, so I let it dry for about 3 hours just to be safe, but once you are confident that it is cured you are ready to hang your cornice box. 
I don't have any photos of this step because I hung it myself, but it's really simple, you slide the soda tabs onto the ladder hooks, and screw the corner braces into the side panels.
Then... you are done! 
Take a step back, look at your hard work, and give yourself a pat on the back!

Linking Up With:


Saturday, March 10, 2012

My Bay Window Cornice Box is Finally Up!

Here she is! I haven't been able to get this window out of my mind for the past couple weeks!
I am beyond excited to finally have this thing hung. I had a really hard time trying to find an inexpensive way to hang this puppy, but today I had an epiphany, and there it is! It's finally hung! I am thrilled and relieved to not have to worry about it anymore. 

It had been sitting on the floor in Olivia's room for a week, and driving me crazy!

She was thinking that it would make a really cool fort, the two side panels are attached with hinges, and move pretty easily, and there was a point when I thought to myself "hmmm, if it doesn't get up, at least she'll be excited to play in it", thankfully it didn't come to that.
It isn't perfect, though it's pretty close, and at a total cost of $25 with extra material for future projects left over I couldn't be happier.
We had a wonderfully productive Friday, between getting the cornice hung, and finally selling our refrigerator, (getting it out of the dining room, once and for all!) I will sleep well tonight!
I took LOTS of photos, so I can give you all a step-by-step tutorial, but it is 1am, and I am so ready to get to bed, so it will have to wait until another day.
Hope you all have a wonderful weekend! It's project time!!!

Saturday, March 3, 2012

Work in Progress

I have a whole lot of projects going on around the house right now, and I can't wait to show you what I'm working on for Olivia's room.

I did a poll over the last two weeks to see what kind of posts my readers are interested in, and How-To's for Home Projects was the winner by far , so I have been working on rounding up some great projects that I will be sharing detailed instructions for. I documented every step of the way for this project in Livi's room, and I'm hoping you will find it all very informative.

When I checked in on Tuesday, I gave you a hint as to what it is, and was hoping it would be up and ready to share by Wednesday or Thursday, unfortunately after I finished it I realized that hanging/ installing it wasn't going to be as simple as I had anticipated, and we are still working on a solution for that. Talk about frustration! After putting a solid couple of hours into figuring out and working on putting it all together I am left with a beautiful project sitting on the floor in our sweet little girls room.
AHHH! The anticipation is just killing me! I am loving the way it turned out, and can't wait to have it in place.
Here's another cropped shot for ya, since I just can't take it any longer. (I'm not good at keeping secrets!)


We also picked up some paint for our Master Bath!!!!!!! WA-HOO!!! Can you tell that I am just a little bit excited to be done with the hideous red-orange. In case you forgot from my Master Bath Mood Board Post the walls currently look something like this-


and I don't want to cause any bodily harm by showing those shots to many times.

The color we chose is dovetail from Sherwin Williams (SW7018)


So, yes I am super psyched to be getting our paint brushes out, and starting to work on taking this bathroom from a bloody nightmare inducing hole to a much more dream like, serene space.
(sorry, if that was a bit overly descriptive, but c'mon people it is B.A.D. up in there)

I'm also working on some furniture refinishing, and simple around the house pick-me-ups, so keep checking in with us, because there's some super fab stuff coming up!

What have you been working on? Anyone added some chevron to their walls?

Related Posts Plugin for WordPress, Blogger...